Zachary Richardson
Cyber Security Specialist, Animator, Programmer,
& Game Designer

Millie
Millie is a 3D character that I Designed, Textured, Rigged, and Animated from the ground up. She was created so I could have my own personal character for making animations and playing around in Unreal Engine.
She was Created with Autodesk Maya, Adobe Substance, Adobe Photoshop, Unreal Engine and Wrap.
Her clothes were made with DAZ Studio and Autodesk Maya

Getting started
In 2022 I taught programming and game design at a local High School. As I instructed I used basic cube shapes to demonstrate how students can program assets to move characters around a scene. This was great for getting students excited for advanced programming. At the time I had been teaching for three years and I thought it would be fun if I could have a home brew character that I could use to move around a scene. I thought this would be exciting as I had always wanted to have my own character. I also though this might make students more excited about 3D modeling in Maya after seeing its full potential.
Chelsey
I had to start somewhere, so I went back to an old college character I had created for a short film called "Teddy" (top). I knew creating a character could take a while and I wanted to start with a base to save time. So I made some adjustments, designed an outfit and gave her the name Chelsey. (I promise she has eyes Sketchfab just doesn't like my textures)
I used Chelsey for about a year and she worked great. Especially for use in the classroom. In fact I still use her in the classroom because, she better represents what a beginner in Maya might make. I can use her to show the steps from Maya rigging/ animation to a Unity/ Unreal import with animations.
However, she was not modeled with the best practices, as I was a young student when I had initially designed her mesh. Because of that she looked a bit clunky, and for personal projects I wanted a better character.


Photorealism
I was never fully satisfied with Chelsey, she was fun, but just too clunky and I didn't feel like she represented my current skill sets. I'm not a bad 3D artist, but I didn't think I could sculpt a photoreal human. I knew about software like DAZ studio, but I didn't want to use someone else's model and call it my own. Which is funny because I will go on to convert the finished character "Millie" to to the DAZ genesis topology for facial rigging. Meaning Millie was still shaped like my design, but with a different polygon mesh layout.
Going back to photorealism, I was motivated to start a new character when I discovered Ziva, the Maya plugin . Ziva is a tool that is meant to help animators simulate fat and muscle movement under the skin to make models look more realistic. I was interested as an animation enthusiast, so I paid for Ziva, and bought an online class to learn the new software. Ziva has several tools, but the one that was most important for Millie was the shrink wrap functions. The Shrink Wrap function, as I have named the feature, allows me to take a skin I already have and vacuum seal it against another.
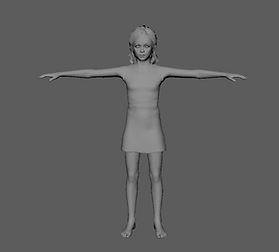
Now Millie does not have simulated fat and muscles on her model, at least not yet. Getting Ziva to work with motion Capture animation imports makes Maya run slow. I will have to create a pipeline for it in the future. However, I was able to make muscles and skeleton using Ziva. Then I used the Ziva Tools to suction cup a skin mesh I created to the intricate muscle shapes. I had to play with the strength of the suction so she would not look anorexic; but eventually along with some hard work and sculpting I ended up with a nice base. This was the first time I had tried something like this, so It took several weeks between the learning and the application of the process.


The Head
I was able to sculpt her head into the shape I wanted, but I needed some help, I was out of my depth. These days I would just use unreal Engine's MetaHuman plugin. Uploading a picture of a person and get a base character head to work with, then design my own person from there. I didn't know about the MetaHuman tool at the time so I designed a child head mesh in a video game and exported it, then I was able to sculpt the child head to look the way I wanted and weld the mesh onto my own character. The hair is made up of planes laid on the head in the shape of hair. the hair textures will make it look real later.
Facial Rigging
I wanted my character to have facial animation in my future animations. So I learned about blend shapes. I also wanted to be able to make characters in the future. So I needed a way to be able to add a facial rig onto different characters, preferably with out having to spend days on a character at a time. I didn't want to pay $500 for a face rig for one character let alone for each future character. I also didn't want to spend weeks making a facial rig for each character.
I found the solution in a Maya plugin made by Kinetic Motive. I paid them for a plugin that works on all DAZ characters and automatically makes a face rig. The only problem was...Millie was not a DAZ character.
Thankfully, the software Wrap exists and I converted my topology to the DAZ topology. This process gave Millie finger and toe nails. Then after a lot of dental and nail work I could import my mesh to DAZ and it worked with the in software tools.
I didn't really need Millie in DAZ, but by getting her working in DAZ I knew that when I went back to Maya, the facial rigging plugin would work. Also DAZ gave me some really nice tongue control joints.


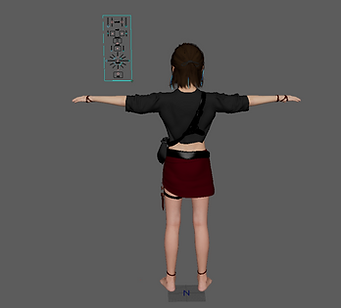
The clothing
Making the body took a while, but because I had bases to work with it wasn't too bad. Even the hair was coming together Now she needed clothing, my plan was to buy clothes on the DAZ store, cut it up, and use the parts to make my own outfit, because again, I needed a base to start with. Below are the first attempts at finishing her. I originally had designed her to be a pirate, which is why her outfit is designed the way it is. In a bit, you will see I changed my mind and changed her into a sorcerer.


Textures
Before we go any further, I should talk about the textures. Her textures were made with Adobe Substance and Photoshop on top of DAZ UV layouts. So I guess DAZ Studio did come in clutch several times. I combined real skin with digital editing to create something unique. Solid colors were made in Maya. Millie's skin is NOT using DAZ skin textures, just DAZ's UV layouts.
Some of her clothing uses textures from the DAZ store, I don't love that I didn't model and texture the entire outfit, but I did design it. Her outfit is completely different from the DAZ store. I really just took parts of outfits from DAZ store, so belts, armor, capes. Then I modified the DAZ pieces and modeled my own pieces. I do plan to make my own outfit completely from scratch eventually.
Problems
It was at this point I wanted to try animating her, so using the skills I learned in college I rigged her up and got some Adobe Miximo animation to test her with.
Well she worked, however there were some painful cavoites.
Firstly, with animation she would on select frames turn into a porcupine and I had no Idea why. In fact I reached out to Polywink.com for help and even they had no clue why it was happening. Secondly, because I used Chelsey as a body size reference, Millie's head was too big. finally her outfit looked kind of skimpy. In my defense, I thought she was going to be a pirate when I first made her
I was over a year into making her at this point and the porcupine issue had me defeated. Well I put her down for a month or two and came back with fresh eyes. The problem turned out to be with my modeling practices. In order to make a single mesh, I had wielded on the head, finger nails, toes nails, and mouth box. Problem was I did not delete my history after doing it. So my Maya scene was huge 247,707 KB to be exact and the extra transforms in the history were causing porcupine spikes and lagging.
Making Her Correctly
To be honest this was like the 5th time I had started over. Each time I had run into a problem UV texture Sets, Porcupine spikes, Wrinkles on wielded body parts during animation, and a massive head remodel. Each time I had fixed an issue that existed and each time I had to start over again. I didn't have a teacher so I had to learn the hard way. Thankfully, I was taking detailed notes and each time I rebuilt her it was faster. By the 5th time it took only one week to make her from the start. but it worked, it finally worked! Well mostly, exporting the file to FBX demonstrated that the dangling hair and cape joints I had set up only worked in Maya. So I had to find a plugin for that, but eventually I managed to fix all of the problems.

Rigging
For rigging initially I used Maya, but the tongue rig from DAZ was too good to pass up. So, the base rig came from DAZ, but I mean it looks the same as any other human rig so what does it matter? The real problems was the skin weights, hair joints, and cape joints.
Starting with the skin weight, the body folded weird during splits or squats. Also the elbows bent too high, so some joints had to be moved and skin weights needed to be repainted. The toes were weighted together as well, creating spikes. It took some time to make her movements and skin folds to look correct.
I had never skin weighted a skirt or clothes on top of a skin mesh before, so I had to learn how to make the clothes not clip into the skin during movement. It was a good skill to learn.
The hair was initially rigged using the N-hair joint system for free swinging. However, it looks like this system can't export as fbx so I needed another solution. Alembic was my first solution, but a 4 GB export file in not a good solution. It did work though. I settled for a Maya plugin I saw advertised by a group I follow on Facebook of all places. The new programed free swinging joints worked for both the hair and waist cape. Exporting as FBX just fine, it does cause Maya to crash sometimes so I just have to save often.
Lastly, I set her whole rig up for motion capture imports for use with Rokoko Studio and Adobe Miximo. I also have the Kinetic Motive plugin that lets me import Facial motion capture data as well.


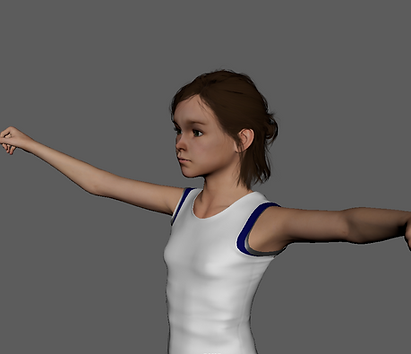
Final Character
Below you can see the final character model and some animations have have made with her. It has taken a little over a year working her on and off to learn the skill sets required to make Millie and fix problems. Now, I could do the whole process in less than a month. I'm sure I would have learned faster under a mentor, but hey, I still learned the skill sets so its a win in my book.
Honestly I am really happy with how she turned out. I think I will make new characters in the future to diversify my portfolio, but for the time being I am going to use Millie in Unreal and practice making short films, games, and Niagara effects with her.


Animations
Alright so where do I go from here? Well, I can finally use Millie for her intended propose. I intend to use Millie as the center point of several special effect animations. I want to use my motion capture suit to capture animations and import them onto Millie and make animations in Unreal and Unity. In the Game engines I can practice programming and making Millie a seamless game character asset with animations that will work with a controller. I will also be working on making Niagara particle magic effects and Houdini effects that I will use Millie for in shorts. It will be great for my demo reel and learning new techniques. See some of the animations I create I will post below.
Millie Shorts:
Follow Me